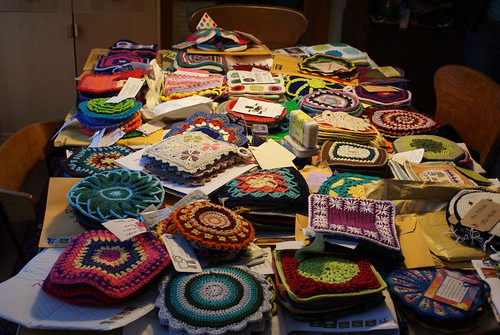
 We've updated the Ravelry group with all the details, and we can't see what awesome things you make this year!

Tuesday, February 5, 2013
It's That Time Again!
I've teamed up with Adrian, Maryse, and Cheryl once again to host Potholder Swap!
We took a year off, but we're back!
We've updated the Ravelry group with all the details, and we can't see what awesome things you make this year!
We've updated the Ravelry group with all the details, and we can't see what awesome things you make this year!

Thursday, January 10, 2013
New Year: New Projects, Old Projects, The Things We Do
Wow, and here we are in 2013!
A few things right away:
THIS.
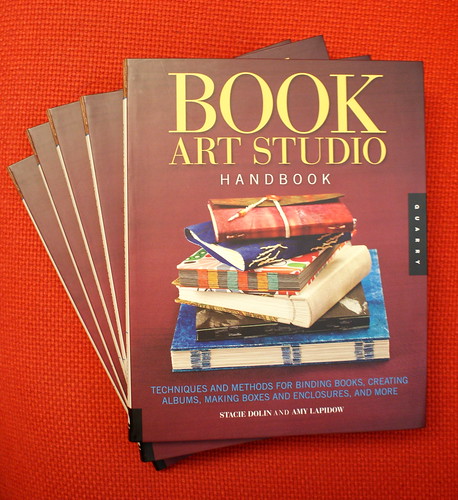 My book is out! After many many editings and many many photoshoots, along with being told that the book was set for APRIL 2013 publication, the book that I wrote with Amy Lapidow came out a week before Christmas! I'm thrilled to hold it in my hands, though I will admit to not yet sitting down and really spending any time with it yet. (I was still exhausted from looking through the same pages so many times....) But I am THRILLED THRILLED THRILLED that it is out and very excited to see what people make from it!
In 2013 news, I've decided to take on a few larger projects - one new, many old.
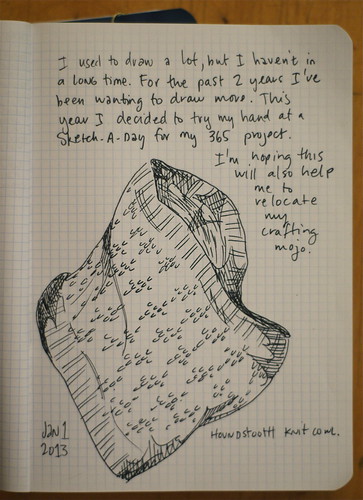
First up, I've decided to do a sketch-a-day through the year. I'm already mildly anxious for warmer weather as all of my sketches so far are late night, in the house.
My book is out! After many many editings and many many photoshoots, along with being told that the book was set for APRIL 2013 publication, the book that I wrote with Amy Lapidow came out a week before Christmas! I'm thrilled to hold it in my hands, though I will admit to not yet sitting down and really spending any time with it yet. (I was still exhausted from looking through the same pages so many times....) But I am THRILLED THRILLED THRILLED that it is out and very excited to see what people make from it!
In 2013 news, I've decided to take on a few larger projects - one new, many old.
First up, I've decided to do a sketch-a-day through the year. I'm already mildly anxious for warmer weather as all of my sketches so far are late night, in the house.
 But the thing I'm really looking forward to - I mean REALLY - is taking care of some unfinished projects. I've got a LOT of partially knit items floating around, and they need to be dealt with before I even consider starting anything else. (Yes, yes, I know I say this all the time, even while casting on......) But this time I'm serious - I called in a professional. The lovely Miss KBlake is The Best at assessing WIPs and deciding 1. if you are ever going to finish something, 2. if, once finished, you will ever wear/use/etc. said project, 3. putting all of these projects in an approachable order. So I called her in! So far THIS YEAR I have finished TWO things:
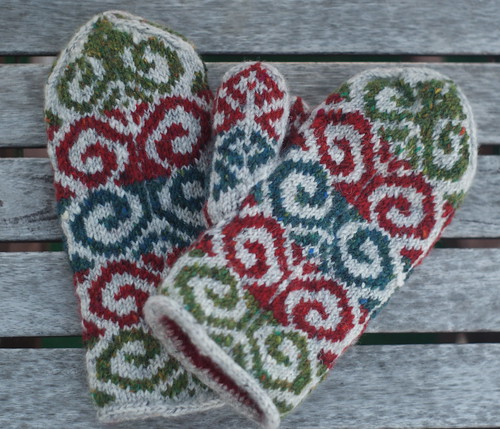 These mittens, which needed.....ONE LINING.
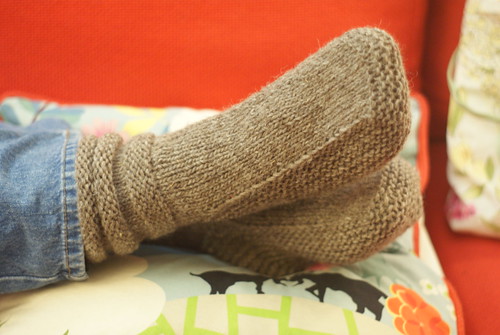 And these Mukluks, which needed...HALF A SLIPPER KNIT UP.
I'm moving on to some of the larger sweateresque projects now. At this rate, if I can hold onto it, I should have an empty WIP basket by the end of February ;)
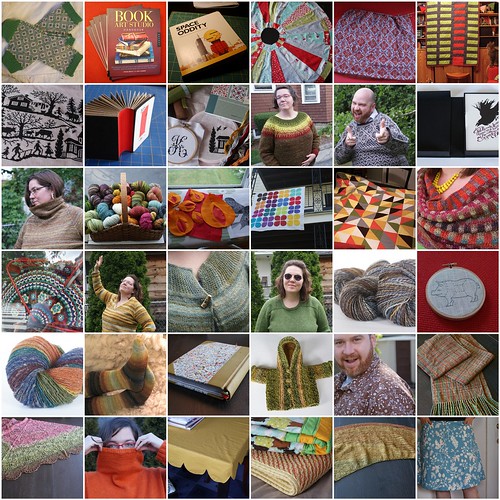
Oh yeah, here's a 2012 round-up:
And these Mukluks, which needed...HALF A SLIPPER KNIT UP.
I'm moving on to some of the larger sweateresque projects now. At this rate, if I can hold onto it, I should have an empty WIP basket by the end of February ;)
Oh yeah, here's a 2012 round-up:
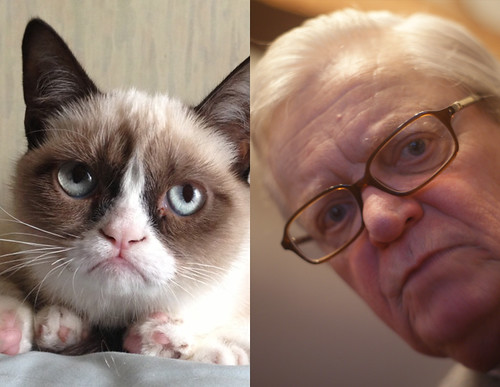
 ANNNNNNDDDDDDD my uncle looks like GrumpyCat:
My book is out! After many many editings and many many photoshoots, along with being told that the book was set for APRIL 2013 publication, the book that I wrote with Amy Lapidow came out a week before Christmas! I'm thrilled to hold it in my hands, though I will admit to not yet sitting down and really spending any time with it yet. (I was still exhausted from looking through the same pages so many times....) But I am THRILLED THRILLED THRILLED that it is out and very excited to see what people make from it!
In 2013 news, I've decided to take on a few larger projects - one new, many old.
First up, I've decided to do a sketch-a-day through the year. I'm already mildly anxious for warmer weather as all of my sketches so far are late night, in the house.
But the thing I'm really looking forward to - I mean REALLY - is taking care of some unfinished projects. I've got a LOT of partially knit items floating around, and they need to be dealt with before I even consider starting anything else. (Yes, yes, I know I say this all the time, even while casting on......) But this time I'm serious - I called in a professional. The lovely Miss KBlake is The Best at assessing WIPs and deciding 1. if you are ever going to finish something, 2. if, once finished, you will ever wear/use/etc. said project, 3. putting all of these projects in an approachable order. So I called her in! So far THIS YEAR I have finished TWO things:
These mittens, which needed.....ONE LINING.
And these Mukluks, which needed...HALF A SLIPPER KNIT UP.
I'm moving on to some of the larger sweateresque projects now. At this rate, if I can hold onto it, I should have an empty WIP basket by the end of February ;)
Oh yeah, here's a 2012 round-up:
ANNNNNNDDDDDDD my uncle looks like GrumpyCat:
Saturday, December 1, 2012
World AIDS Day Project
The ever-so-gracious and absolutely wonderful Stephen is once again hosting his Worlds AIDS Day Project, this year with funds raised going to the Lansing area AIDS network. It's for a great cause, and Stephen has gathered up a GREAT group of sponsors and prizes that you can win for contributing. And I'm one of them!
This handmade album could be yours:
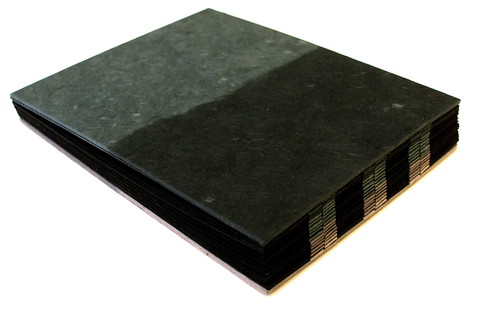 Head on over here to read all about this great cause and how you can help.
Head on over here to read all about this great cause and how you can help.
Saturday, November 10, 2012
Connie
Amy's MIL Connie is a big quilter. Due to failing eyesight and portability, she only works on hex quilts these days, and they are done completely by hand. She likes to test the limits of the hex while remaining true to the traditional quilting patterns and methods.
I was visiting Connie the other day to do some finish work on her bookshelves. She's also in a state of divesting her quilt library. Welcome to MY new quilt book collection:
 While I was there, I chatted to her a bit about her quilts, and managed to get some pictures of her 3 most prized quilts, which are the main features of 2 bedrooms in her home.
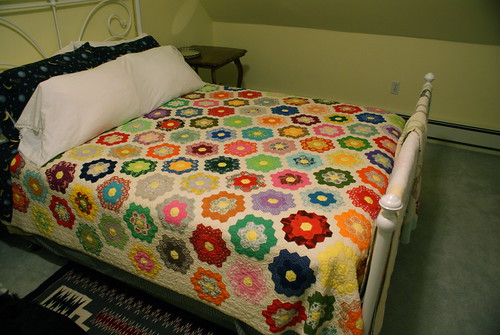 This first one is made from 2" hexes. Connie collected fabrics from all of her neighbors and students and parents and all the people in her life at the time, and made this fantastic traditional flower hex quilt. She said she enjoyed working on the hex quilts while her kids were young due to how easy it was it was to take along with her. The quilting itself took longer than the top - she couldn't take it with her, and had to work on it in spurts here and there. But she got it done!
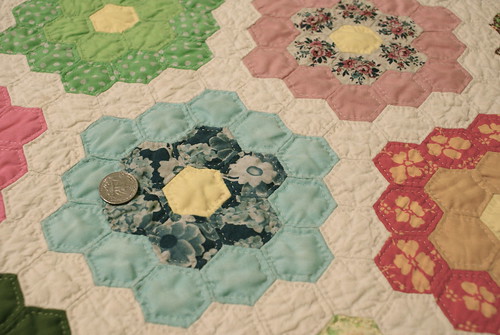 Connie decided to take the hexes a step further - this next quilt is constructed of hexes that end up being 1/2" once sewn. She says this is the smallest reasonable (HA!) size to work with and still have shape and pattern recognition in the finished quilt. This quilt is BANANAS. Due to the excess material behind each hex piece, the finished quilt has a slightly puffed-hex feel to it.
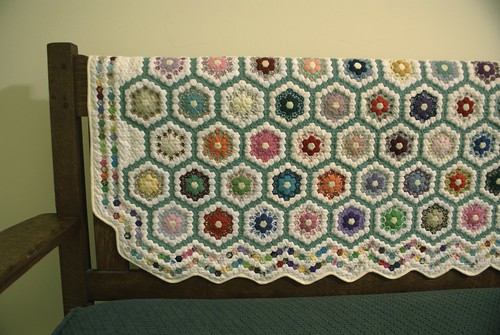 She opted to maintain the hexagonal edges on this one. The finished piece is about 40" x 30".
 I got the impression from Connie that the quilt she is most proud of is her Bicentennial Quilt. It's a red-white-and-blue hex quilt that is chock full of fussy-cuts.
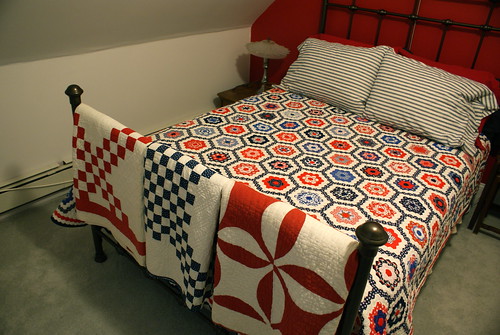 In talking with her, she mentioned that many bicentennial quilts were constructed to include parts of ancestral centennial quilts that were never completed! Connie didn't have any of those on hand, but she also did not want to leave her children with an unfinished quilt. She opted to have the hand-quilting done by someone else, but maintained the traditional quilting patterns.
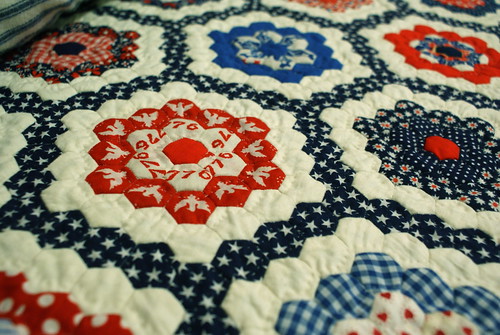 She also "signed" it in 2 corners, with fussy cuts of her name.
 Connie's asked me to help her sign the back of these quilts by embroidering her signature on the back of each. Hooray! It will be great to get a better feel of how they're made.
More Connie chronicles to come - she claims to have some unfinished quilt pieces to pass on to me, and I'm sure to be inspired by this bundle of books!
Connie's asked me to help her sign the back of these quilts by embroidering her signature on the back of each. Hooray! It will be great to get a better feel of how they're made.
More Connie chronicles to come - she claims to have some unfinished quilt pieces to pass on to me, and I'm sure to be inspired by this bundle of books!
While I was there, I chatted to her a bit about her quilts, and managed to get some pictures of her 3 most prized quilts, which are the main features of 2 bedrooms in her home.
This first one is made from 2" hexes. Connie collected fabrics from all of her neighbors and students and parents and all the people in her life at the time, and made this fantastic traditional flower hex quilt. She said she enjoyed working on the hex quilts while her kids were young due to how easy it was it was to take along with her. The quilting itself took longer than the top - she couldn't take it with her, and had to work on it in spurts here and there. But she got it done!
Connie decided to take the hexes a step further - this next quilt is constructed of hexes that end up being 1/2" once sewn. She says this is the smallest reasonable (HA!) size to work with and still have shape and pattern recognition in the finished quilt. This quilt is BANANAS. Due to the excess material behind each hex piece, the finished quilt has a slightly puffed-hex feel to it.
She opted to maintain the hexagonal edges on this one. The finished piece is about 40" x 30".
I got the impression from Connie that the quilt she is most proud of is her Bicentennial Quilt. It's a red-white-and-blue hex quilt that is chock full of fussy-cuts.
In talking with her, she mentioned that many bicentennial quilts were constructed to include parts of ancestral centennial quilts that were never completed! Connie didn't have any of those on hand, but she also did not want to leave her children with an unfinished quilt. She opted to have the hand-quilting done by someone else, but maintained the traditional quilting patterns.
She also "signed" it in 2 corners, with fussy cuts of her name.
Connie's asked me to help her sign the back of these quilts by embroidering her signature on the back of each. Hooray! It will be great to get a better feel of how they're made.
More Connie chronicles to come - she claims to have some unfinished quilt pieces to pass on to me, and I'm sure to be inspired by this bundle of books!
Wednesday, October 10, 2012
Flashcards
I just finished up a pretty interesting bookbinding project. A set of flashcards, printed on 2mm thick pressboard, flush to edge on one side, to be bound together in some way. The cards are just stunning - they are from B.Impressed, a wonderful letterpress shop in the Boston area.
 After thinking about this project for a looooong time, I decided the best way to handle this would be a hybrid accordion/flag binding. I could use the front of each card for attachment since the type/text did not go flush to edge. I chose a mid-weight Canson paper in a red to match the printed type.
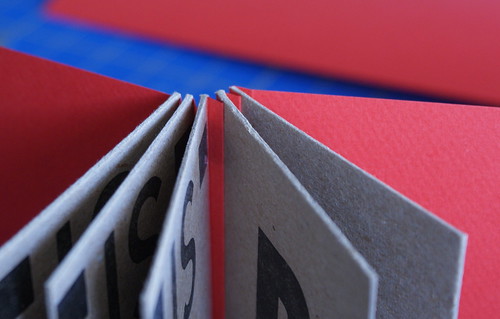 I created a small (5mm) accordion pleat to use as a hinge on each of the cards. I then wrapped the remaining paper around the outer (2mm) side of the board, working it tightly, before crafting the next hinge. Each fold was carefully measured and scored before being adhered to the next image. This added a little bit of bulk to the spine edge of the book, but not excessively - it allows the book to open quite nicely, it almost "rolls" open.
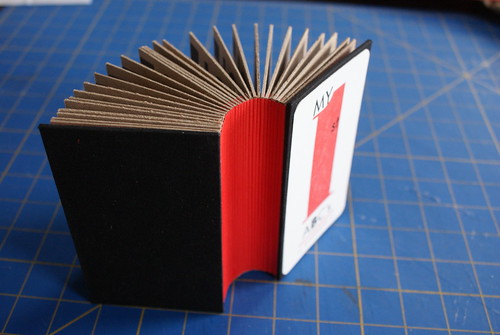 I wanted to avoid any extra torque or pull on the paper hinges, so once the boards were all together I went in on the back of the spine and glued the back-hinges together as well. This served to stabilize the whole thing a bit more - it wasn't as Slinky®-esque.
I finished the whole thing with slightly oversized black cloth-covered boards and adhered the frontispiece to the cover.
I wanted to avoid any extra torque or pull on the paper hinges, so once the boards were all together I went in on the back of the spine and glued the back-hinges together as well. This served to stabilize the whole thing a bit more - it wasn't as Slinky®-esque.
I finished the whole thing with slightly oversized black cloth-covered boards and adhered the frontispiece to the cover.
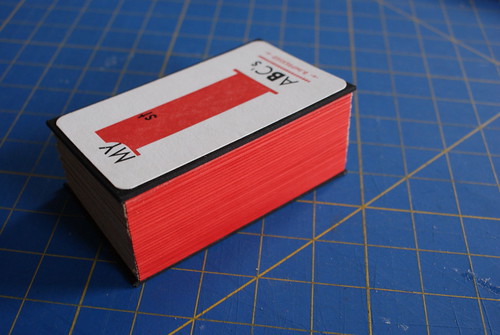 You can see in that final image that the red on the spine does not go flush to edge. The original boards were not cut flush - the sizes varied by about a millimeter in any/all directions. Rather than trim them all down, I opted to use them as is, and bring the hinge mechanism in from the edge by a hair. I'm pleased with how it came out. I feared that doing it flush would show any inconsistency more than deliberately working with the inconsistencies.
I'm satisfied with how this came out! I did a lot of thinking about exactly how to tackle this project - it was a great problem-solving project (which I love!) and it was nice to come up with a solution combining different bindings and solutions.
You can see in that final image that the red on the spine does not go flush to edge. The original boards were not cut flush - the sizes varied by about a millimeter in any/all directions. Rather than trim them all down, I opted to use them as is, and bring the hinge mechanism in from the edge by a hair. I'm pleased with how it came out. I feared that doing it flush would show any inconsistency more than deliberately working with the inconsistencies.
I'm satisfied with how this came out! I did a lot of thinking about exactly how to tackle this project - it was a great problem-solving project (which I love!) and it was nice to come up with a solution combining different bindings and solutions.
After thinking about this project for a looooong time, I decided the best way to handle this would be a hybrid accordion/flag binding. I could use the front of each card for attachment since the type/text did not go flush to edge. I chose a mid-weight Canson paper in a red to match the printed type.
I created a small (5mm) accordion pleat to use as a hinge on each of the cards. I then wrapped the remaining paper around the outer (2mm) side of the board, working it tightly, before crafting the next hinge. Each fold was carefully measured and scored before being adhered to the next image. This added a little bit of bulk to the spine edge of the book, but not excessively - it allows the book to open quite nicely, it almost "rolls" open.
I wanted to avoid any extra torque or pull on the paper hinges, so once the boards were all together I went in on the back of the spine and glued the back-hinges together as well. This served to stabilize the whole thing a bit more - it wasn't as Slinky®-esque.
I finished the whole thing with slightly oversized black cloth-covered boards and adhered the frontispiece to the cover.
You can see in that final image that the red on the spine does not go flush to edge. The original boards were not cut flush - the sizes varied by about a millimeter in any/all directions. Rather than trim them all down, I opted to use them as is, and bring the hinge mechanism in from the edge by a hair. I'm pleased with how it came out. I feared that doing it flush would show any inconsistency more than deliberately working with the inconsistencies.
I'm satisfied with how this came out! I did a lot of thinking about exactly how to tackle this project - it was a great problem-solving project (which I love!) and it was nice to come up with a solution combining different bindings and solutions.
Sunday, September 16, 2012
FO: Coffeehouse Pullover
Months ago, I was lucky enough to get on the special order list for Southern Cross Fibre. I knew for sure that I wanted to make a colorwork *something*, but I wasn't certain of just what. I toyed with the idea of a little bit of EVERY color from the Spring/Summer 2012 Semi-solids collection, then narrowed it down to something like 8 different 2-color combinations. In the end, I decided on "Java" and "Silver Sconce" on Shetland.
 I set out to spin yarn that as similar in hand to Jamieson's Shetland 2-Ply - I had been eying the Schoolhouse Pullover by Meg Swansen in the book "Knitting in America" for YEARS. This seemed to be just the right time - and yarn! - for it. Adding to that, I had a wedding anniversary right around the corner. I decided that I'd make this for D as an anniversary present.
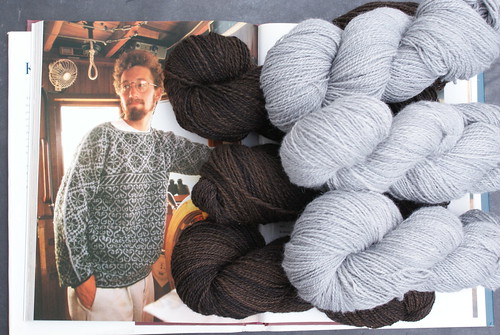 The pattern calls for a purl-when-you-can border, but I read that many people still had the lower edge curling. I opted for a turned cuff, and decided to sneak in a little bit of personalization on that edge - I put D's name, my name, the year knit, etc.
 The body of the sweater went quite quickly. The patterns are easily memorized, and the whole thing is knit in the round. When it came time to steek the armholes for the sleeves, I decided to work a crochet steek and to pick up and begin knitting the sleeves down BEFORE cutting the steek. This was just a little bit of insurance to make sure the stitches wouldn't pull out from the strain of picking up stitches. Things slowed down a bit on the sleeves knitting, as it became very hot and humid here (once again, ugh) and at this point I had to have the entire sweater on my lap while working on it. There is an I-cord detail worked along the top of each of the sleeves, and the decrease shaping is ingeniously worked under it.
 The collar gave me a bit of trouble - it turned out to be quite boat-necky, even with my having made it smaller in the knitting. I knew D wouldn't wear it if it was too wide. I worked an I-cord bind-off, and then picked up inside of that to work a turned hem mitered collar. I think the double bind-offs around the neck give it some much-needed structure and shape.
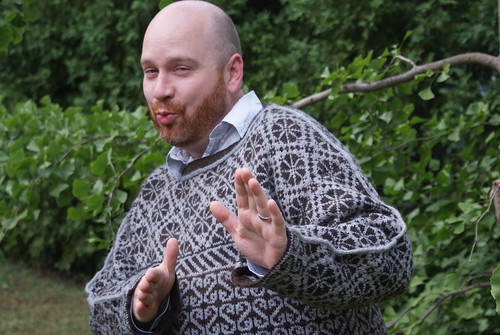
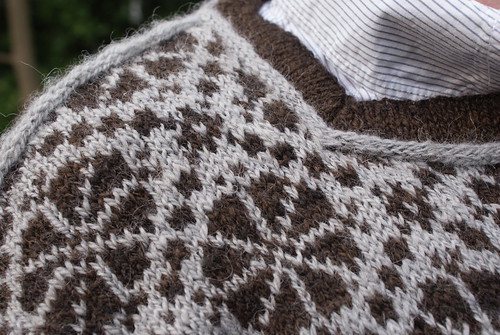 And it fits! And he loves it! I'm thrilled to have finally made this sweater, and I can't wait to see it worn. Hooray!
I set out to spin yarn that as similar in hand to Jamieson's Shetland 2-Ply - I had been eying the Schoolhouse Pullover by Meg Swansen in the book "Knitting in America" for YEARS. This seemed to be just the right time - and yarn! - for it. Adding to that, I had a wedding anniversary right around the corner. I decided that I'd make this for D as an anniversary present.
The pattern calls for a purl-when-you-can border, but I read that many people still had the lower edge curling. I opted for a turned cuff, and decided to sneak in a little bit of personalization on that edge - I put D's name, my name, the year knit, etc.
The body of the sweater went quite quickly. The patterns are easily memorized, and the whole thing is knit in the round. When it came time to steek the armholes for the sleeves, I decided to work a crochet steek and to pick up and begin knitting the sleeves down BEFORE cutting the steek. This was just a little bit of insurance to make sure the stitches wouldn't pull out from the strain of picking up stitches. Things slowed down a bit on the sleeves knitting, as it became very hot and humid here (once again, ugh) and at this point I had to have the entire sweater on my lap while working on it. There is an I-cord detail worked along the top of each of the sleeves, and the decrease shaping is ingeniously worked under it.
The collar gave me a bit of trouble - it turned out to be quite boat-necky, even with my having made it smaller in the knitting. I knew D wouldn't wear it if it was too wide. I worked an I-cord bind-off, and then picked up inside of that to work a turned hem mitered collar. I think the double bind-offs around the neck give it some much-needed structure and shape.
And it fits! And he loves it! I'm thrilled to have finally made this sweater, and I can't wait to see it worn. Hooray!
Monday, September 3, 2012
On Hand-Quilting
It's been cooling off a bit this week (finally!) and that means I can get back to some quilting! I've had a few quilts in assorted states of non-completion due to hand-quilting. I thought I'd chatter a bit about hand-quilting and how I do it, when I do it, and all that jazz.
I hand-quilted all of my quilts for a few years, simply due to the logistics of having to cram an entire queen-sized quilt into my wee machine and definitely wanting to work from the center out. In my thinking about it, I was pretty convinced that the maneuvering of a large quilt in the machine would take me about the same time to quilt as it would take to work it up by hand. I've since learned that this is not true, and I've become quite comfortable with machine-quilting. But every once in a while a quilt demands hand-quilting!
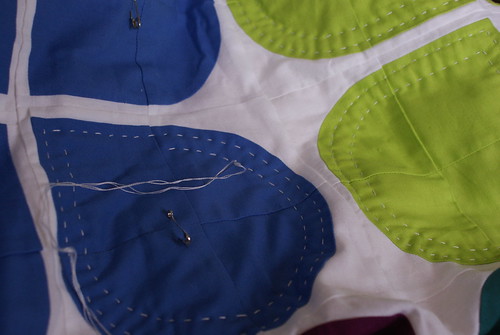 Right now I'm working my way through this Retro Flowers quilt. I'm working 2 lines of quilting within each petal of the flower (I can go back in and do another round if I think it needs it). I knew that I wanted to quilt this within each petal, and I machine-quilted 2 petals and did not like it one bit! The curve of the petals is a bit too tight to be able to comfortably manipulate the entire quilt through. I ripped that stitching out (...before getting a picture, sorry!) and decided that hand-quilting would be the best way to go.
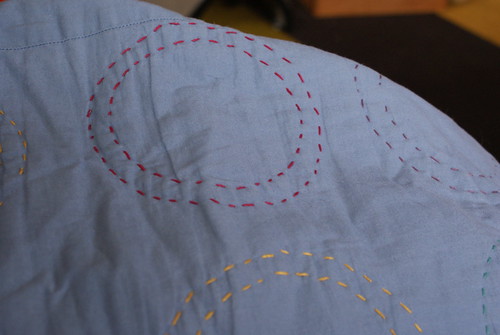
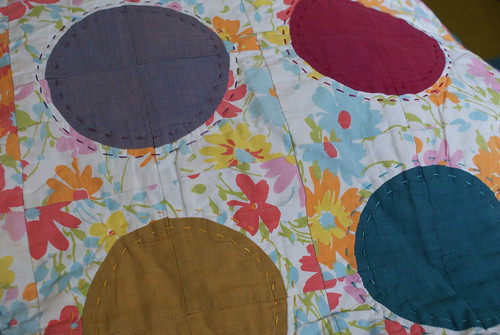 I tend to do any hand-quilting using 2 strands of DMC floss rather than traditional quilting thread. I also work the stitches to be a bit longer. I figure if I'm going to go to the trouble of hand-quilting the whole thing, I want it to show, to be a design element. I also find that it lends itself to a stronger motif on the back of the quilt:
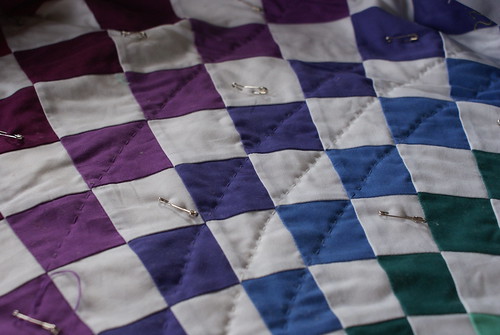
 For some quilts, the decision to hand-quilt is largely a logistical issue. I've decided to hand-quilt the Vortex Quilt because the quilt is IMMENSE - it's ~80" square. I also thought it might be a bit of a beast to run through the machine, as there are many many many tight seams piled up very close together toward the center. Due to the size of this quilt and the overwhelming task of hand-quilting it, I've had the help of some friends! It's getting quilted up bee-style, with each person working on a different portion of the quilt. While this leads to a bit of unevenness in the stitching, I'm not too concerned - I think the quilt is large enough and things are distributed enough that it won't matter in the end. (Also, it will be DONE!)
 This simple Crosses Quilt also received the hand-quilt treatment:
 Again, I think this was a decision based on size. I find that I am also more prone to hand-quilt if the quilt-top can be broken down into a base shape - squares, circles, petals. That way I can gauge my progress a bit more, and I can set "goals" for myself when I'm working on it (...only 2 more squares...) For this green quilt, I treated the large empty squares with diagonal stitches of tangerine and mimicked the lines of the pieced blocks in white and green. That was all to make the back nicer:
 I also love how the hand-quilting feels in the completed quilt - it really puckers it up nicely.
This embroidered bird quilt got it too:
I also love how the hand-quilting feels in the completed quilt - it really puckers it up nicely.
This embroidered bird quilt got it too:
 Again, largely due to the size of the quilt. But also due to the bird images - any all-over pattern would interfere with the embroidery. And the combination of embroidery with machine-quilting on this Did. Not. Work. If I recall, I may have also been of the twisted mind "Hey, I've already put 600 hours of work into this, what's another 20?" It was definitely the right thing to do in this case.
So, that's how I feel about hand-quilting and why I do it sometimes. Stock up on DMC, get your needles and thimbles, and get to it! It's quite satisfying.
Again, largely due to the size of the quilt. But also due to the bird images - any all-over pattern would interfere with the embroidery. And the combination of embroidery with machine-quilting on this Did. Not. Work. If I recall, I may have also been of the twisted mind "Hey, I've already put 600 hours of work into this, what's another 20?" It was definitely the right thing to do in this case.
So, that's how I feel about hand-quilting and why I do it sometimes. Stock up on DMC, get your needles and thimbles, and get to it! It's quite satisfying.
Right now I'm working my way through this Retro Flowers quilt. I'm working 2 lines of quilting within each petal of the flower (I can go back in and do another round if I think it needs it). I knew that I wanted to quilt this within each petal, and I machine-quilted 2 petals and did not like it one bit! The curve of the petals is a bit too tight to be able to comfortably manipulate the entire quilt through. I ripped that stitching out (...before getting a picture, sorry!) and decided that hand-quilting would be the best way to go.
I tend to do any hand-quilting using 2 strands of DMC floss rather than traditional quilting thread. I also work the stitches to be a bit longer. I figure if I'm going to go to the trouble of hand-quilting the whole thing, I want it to show, to be a design element. I also find that it lends itself to a stronger motif on the back of the quilt:
For some quilts, the decision to hand-quilt is largely a logistical issue. I've decided to hand-quilt the Vortex Quilt because the quilt is IMMENSE - it's ~80" square. I also thought it might be a bit of a beast to run through the machine, as there are many many many tight seams piled up very close together toward the center. Due to the size of this quilt and the overwhelming task of hand-quilting it, I've had the help of some friends! It's getting quilted up bee-style, with each person working on a different portion of the quilt. While this leads to a bit of unevenness in the stitching, I'm not too concerned - I think the quilt is large enough and things are distributed enough that it won't matter in the end. (Also, it will be DONE!)
This simple Crosses Quilt also received the hand-quilt treatment:
Again, I think this was a decision based on size. I find that I am also more prone to hand-quilt if the quilt-top can be broken down into a base shape - squares, circles, petals. That way I can gauge my progress a bit more, and I can set "goals" for myself when I'm working on it (...only 2 more squares...) For this green quilt, I treated the large empty squares with diagonal stitches of tangerine and mimicked the lines of the pieced blocks in white and green. That was all to make the back nicer:
I also love how the hand-quilting feels in the completed quilt - it really puckers it up nicely.
This embroidered bird quilt got it too:
Again, largely due to the size of the quilt. But also due to the bird images - any all-over pattern would interfere with the embroidery. And the combination of embroidery with machine-quilting on this Did. Not. Work. If I recall, I may have also been of the twisted mind "Hey, I've already put 600 hours of work into this, what's another 20?" It was definitely the right thing to do in this case.
So, that's how I feel about hand-quilting and why I do it sometimes. Stock up on DMC, get your needles and thimbles, and get to it! It's quite satisfying.
Subscribe to:
Posts (Atom)